Custom Microsoft Fabric MCP endpoint in Microsoft Agent Framework - Part 2
The first article on this topic was focused on setting up an Azure Function for MCP and ways to leverage IMemoryCache to reduce redundant API calls.
In this article, we will explore how to set up an MCP (Model Context Protocol) client that can communicate with MCP endpoints exposed through Azure Functions. We will look at how the MCP client can invoke the tools provided by the MCP server.
We will also implement a Handoff workflow pattern to control and determine the flow of agent execution.
The workflow will allow an initial agent called as an triage agent to understand the user's request and hand it off to it the appropriate agent specialized for that task.
Note that user requests can differ across each user prompt. In our use case an user can request a list of workspace or a list of datapipelines in a given workspace or job execution details
By the end of the article we will have a complete flow that brings together MCP, Azure Functions, Microsoft Entra authentication and agent handoff orchestration.
Before we move ahead , we will have configure the required Microsoft Entra settings to secure access call Microsoft Fabric API's.
The underlying service principal that we will use requires underlying delegated access to the Fabric service. In our use case, grant the following delegate permissions to the service principal.
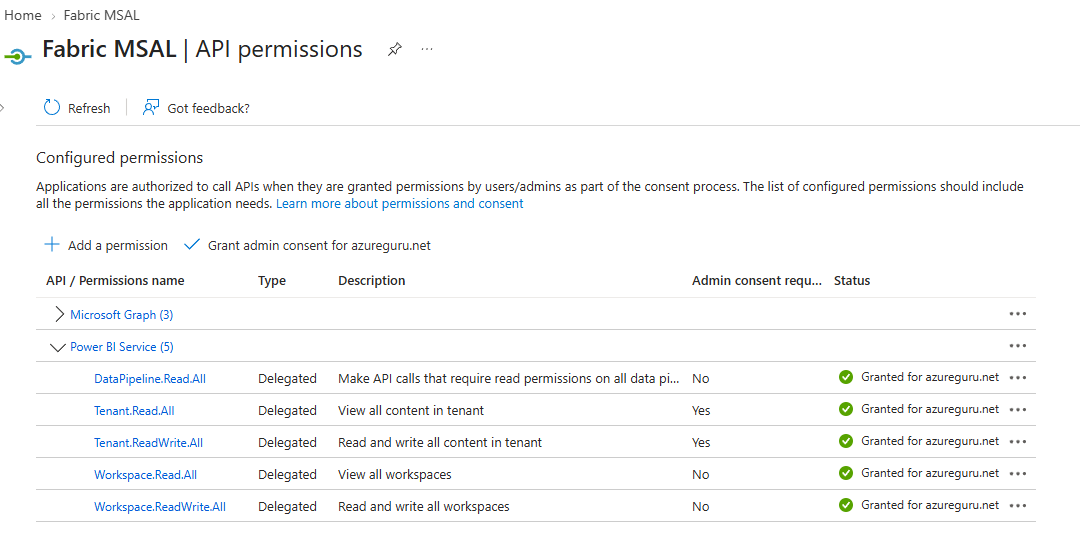
Also note down the service principal of the ClientId. We require its value in our code to generate the access token on behalf of the logged in user.
Project SetUp
Create a new console application and add the following packages
dotnet add package Azure;
dotnet add package Azure.AI.OpenAI;
dotnet add package Microsoft.Agents.AI;
dotnet add package Microsoft.Extensions.AI;
dotnet add package System.Text.Json.Serialization;
dotnet add package Microsoft.Extensions.Configuration;
dotnet add package Microsoft.Extensions.DependencyInjection;
dotnet add package Microsoft.Extensions.Logging;
Add appsetting.json to the project
"AppSettings": {
    "Chat_DeploymentName": "Deployment Name",
    "EndPoint": "Azure OpenAI endpoint",
    "ApiKey": "Azure OpenAI API key"
}
Declare a bunch of variables >>
 private static string RedirectURI = "http://localhost";
 private static string clientId = "Service Principal CLient Id";
 private static readonly HttpClient client = new HttpClient();
 private static string[] scopes = new string[] { "https://api.fabric.microsoft.com/.default" };
 private static string Authority = "https://login.microsoftonline.com/{tenantId}";
We used the Fabric scope : https://api.fabric.microsoft.com/.default
Code
Create a DI container
ServiceCollection servicecollection = new ServiceCollection();
Read from the configuration file
var configuration = new ConfigurationBuilder()
      .SetBasePath(Directory.GetCurrentDirectory())
      .AddJsonFile("appsettings.json", optional: false)
      .Build();
Read credentials and register Chatclient
var credential = new AzureKeyCredential(configuration["AppSettings:ApiKey"]);

servicecollection.AddKeyedChatClient(
    "ChatClient",
    (
        sp =>
            new AzureOpenAIClient(new Uri(configuration["AppSettings:EndPoint"]), credential)                .GetChatClient(configuration["AppSettings:Chat_DeploymentName"])
   .AsIChatClient()
    )
);
Build the Service Provider
ServiceProvider serviceprovider = servicecollection.BuildServiceProvider();
Token Generation >>
public async static Task<AuthenticationResult> ReturnAuthenticationResult(string[] scopes)
 {
     string AccessToken;
     PublicClientApplicationBuilder PublicClientAppBuilder =
         PublicClientApplicationBuilder.Create(clientId)
         .WithAuthority(Authority)
         .WithCacheOptions(CacheOptions.EnableSharedCacheOptions)
         .WithRedirectUri(RedirectURI);

     IPublicClientApplication PublicClientApplication = PublicClientAppBuilder.Build();
     var accounts = await PublicClientApplication.GetAccountsAsync();
     AuthenticationResult result;
     try
     {
         result = await PublicClientApplication.AcquireTokenSilent(scopes, accounts.First())
                .ExecuteAsync()
                .ConfigureAwait(false);
     }
     catch
     {
         result = await PublicClientApplication.AcquireTokenInteractive(scopes)
                .ExecuteAsync()
                .ConfigureAwait(false);
     }

     return result;
 }
In the above function we used the MSAL library for token generation through Public Application Builder .With this approach there is no need for maintaining Service Principal client secrets anywhere.
Client MCP Function >>
public static async Task<List<McpClientTool>> ConnectFabricMCP()
{

AuthenticationResult result_fabric = await ReturnAuthenticationResult(scopes);

    var httpClient = new HttpClient
    {
        Timeout = Timeout.InfiniteTimeSpan
    };
    var transport = new ModelContextProtocol.Client.HttpClientTransport(
        new HttpClientTransportOptions
        {
            Endpoint = new Uri("MCP EndPoint URI"),
            Name = "Custom Fabric Data Factory MCP",
            TransportMode = HttpTransportMode.AutoDetect,
            EnableStandaloneGetStream = false,
            AdditionalHeaders = new Dictionary<string, string>
            {
                { "Authorization", $"Bearer {result_fabric.AccessToken}"},
                { "UserId", $" {result_fabric.ClaimsPrincipal.Claims.FirstOrDefault(c => c.Type == "email").Value}"}
            },
        },
    httpClient
    );

    var mcpClient = await McpClient.CreateAsync(transport);
    var tools = await mcpClient.ListToolsAsync();
    return tools.ToList();
}
Please refer to this article for more details on how to set Client MCP function.
An Important point I would like to highlight in the above code is the inclusion of the user email from the Entra account of the logged in user. The email value is mapped as UserId to uniquely set the CacheKey in the IMemoryCache that we had set in our first article.
ChatClient >>
Create an instance of chatclient
var chatclient = new ChatClientAgent(serviceprovider.GetKeyedService<IChatClient>("ChatClient")).ChatClient;
ChatClientAgentOptions >>
We then create three separate agent option configurations one for each specialized agent that will participate in the handoff workflow.
HandOffWorkFlow
OptionsTriageAgent :
var optionstriageagent = new ChatClientAgentOptions()
{
    ChatOptions = new ChatOptions()
    {
        Instructions = "You will determine if the user is asking for a list of workspaces or pipeline details and route the request to the specific agent. ALWAYS handoff to another agent. "
    },

    Name = "Triage Agent"
};
OptionsWorkspaceAgent :
var optionsworkspaceagent = new ChatClientAgentOptions()
 {
     ChatOptions = new ChatOptions()
     {
         Instructions = "You provide a list of workspaces.You will display the output returned to you in a list format in a markdown table format.",
         ToolMode = AutoChatToolMode.Auto,
         Tools = [.. await ConnectFabricMCP()]
     },
     Name = "Workspace Agent"
 };
OptionsDataPipelinesAgent :
var optionsdatapipelinesagent = new ChatClientAgentOptions()
{
    ChatOptions = new ChatOptions()
    {
        Instructions = "You provide a list of datapipelines in a given workspace.You will display the output returned to you in a table format with columns Workspace,DisplayName,Description. Please ensure that the columns are equally resized and word wrapped",
        ToolMode = AutoChatToolMode.Auto,
        Tools = [.. await ConnectFabricMCP()]
    },
    Name = "Datapipeline Agent"
};
OptionsDataPipelinesJobStatusAgent :
   var optionsdatapipelinesjobstatusagent = new ChatClientAgentOptions()
   {
       ChatOptions = new ChatOptions()
       {
           Instructions = "You provide datapipeline job status.you will display the output returned to you in bulleted points with details PipelineRunStatus,Error,Suggestions,JobEndDate. If Error and Suggestions are empty then display their values as NONE.Add an empty line between each bullet point.",
           ToolMode = AutoChatToolMode.Auto,
           Tools = [.. await ConnectFabricMCP()]
       },
       Name = "DatapipelineJobStatus Agent"
   };
AIAgents >>
Next, we create individual agent instances from the shared ChatClient instance.
We create four agents:
Triage Agent – determines which specialized agent should handle the user's request.
Workspace Agent – handles workspace-related operations and queries.
Data Pipeline Agent – handles datapipeline-related requests.
Data Pipeline Job Status Agent – retrieves latest the execution status of datapipeline jobs.
var agent_triage =
    chatclient.AsAIAgent(optionstriageagent);

var agent_workspace =
    chatclient.AsAIAgent(optionsworkspaceagent);

var agent_datapipeline =
    chatclient.AsAIAgent(optionsdatapipelinesagent);

var agent_datapipeline_jobstatus =
    chatclient.AsAIAgent(optionsdatapipelinesjobstatusagent);
Inspite of all four agents using the same ChatClient instance, each agent has its own configuration.
Workflow Agents >>
Here the triage agent (agent_triage) determines which agent should process the user request.
var workflow = AgentWorkflowBuilder.CreateHandoffBuilderWith(agent_triage)
    .WithHandoffs(agent_triage, [agent_workspace, agent_datapipeline, agent_datapipeline_jobstatus])
    .WithHandoffs([agent_datapipeline_jobstatus, agent_datapipeline, agent_workspace], agent_triage)
    .Build();
These three agents will work together as part of the handoff workflow with the triage agent receiving control based on the user's request and determining the routing to be handed over to the relevant agent.
Console Loop >>
  while (true)
  {
      Console.Write("\nYou:");

      string? input = Console.ReadLine();

      Console.WriteLine();
      if (string.IsNullOrWhiteSpace(input))
          continue;

      if (input.Equals("exit", StringComparison.OrdinalIgnoreCase))
          break;

      Console.WriteLine(await workflow.AsAIAgent().RunAsync(input));

  }
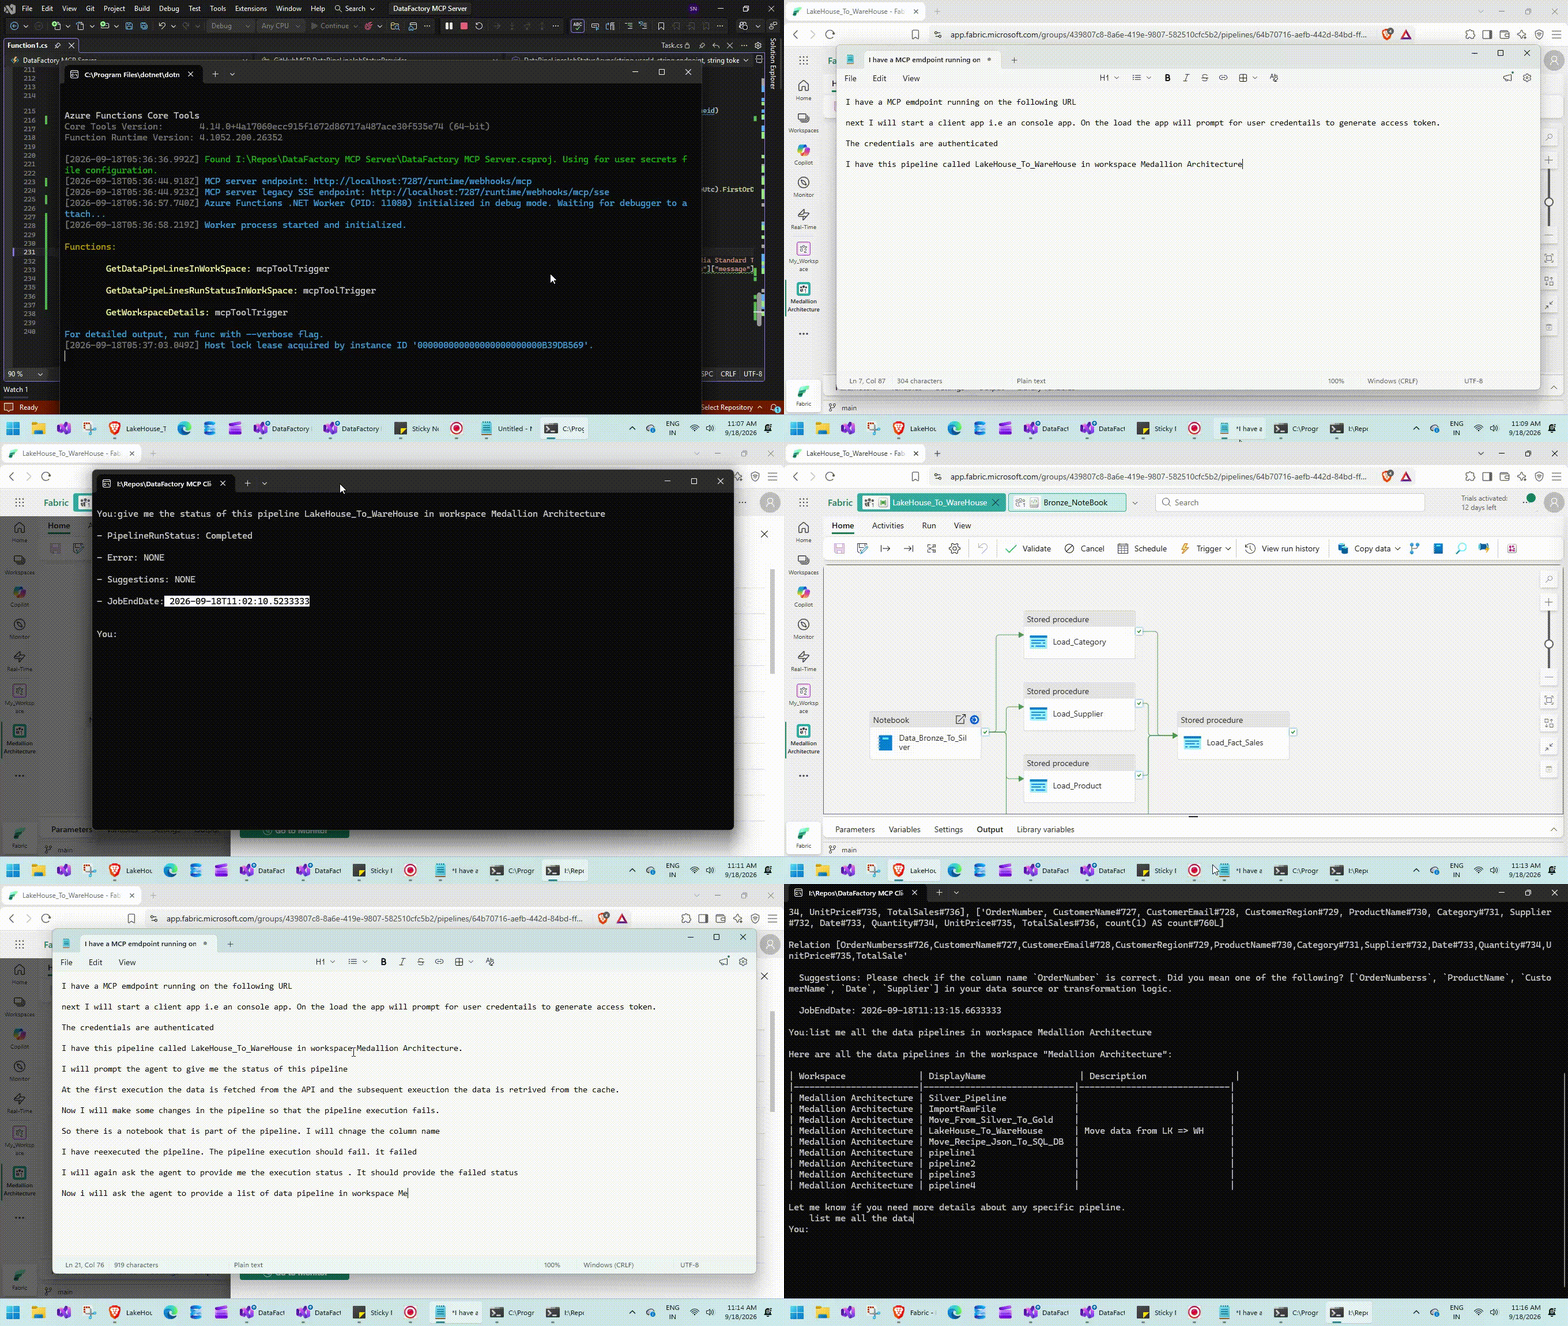
Execution
Conclusion
This concludes two part series on how to setup and configure IMemoryCache in the MCP endpoint and its underlying MCP client set up.
Across these two parts we covered the key concepts involved in configuring IMemoryCache to reduce the redundant and repetitive API calls.
Also we saw how to set up required dependencies, understanding how the cache interacts with the underlying client and how to leverage the workflow handoff pattern to direct user requests to a specific AIAgent.
Thanks for reading !!!