Agent Identity for AI Agents in Microsoft Agent Framework
What are Agent Identities ?
Think of Agent Identities as the equivalent of Managed Identities in Azure.
Why we require Agent Identities ?
Lets go back to an article I had posted few weeks ago on how to leverage Entra OAuth to securely access Azure resources . You can find it here.
The process in that article involved configuring delegate permissions for the service principal to request access to the Azure resource on behalf of the user. The access request is then authorized or denied based on the users assigned Azure RBAC permissions.
The main reason to prefer Microsoft Entra Agent identities over a traditional OAuth delegated flow is that Agent identities give AI agents a distinct identity of their own, rather than relying exclusively on a signed-in user's identity or the identity of the application hosting the agent.
Agent Identities are not a replacement for OAUTH flows. They should be used when you want the agent to work autonomously and no user sign in required .They behave similar to Azure Managed Identities.
But there is one clear distinction. Unlike Manage Identities, Agent Identities can be be accessed and processed by agents running outside of Azure environment.
To conceptually learn and understand more about Agent Identities please refer to Microsoft's detailed documentation here.
In this article we will look into how to set up an AI Agent in Microsoft Agent Framework to run under Agent identity to access Azure resource without setting up and relying on the traditional delegated user-delegated OAUTH flow.
Agent BluePrint
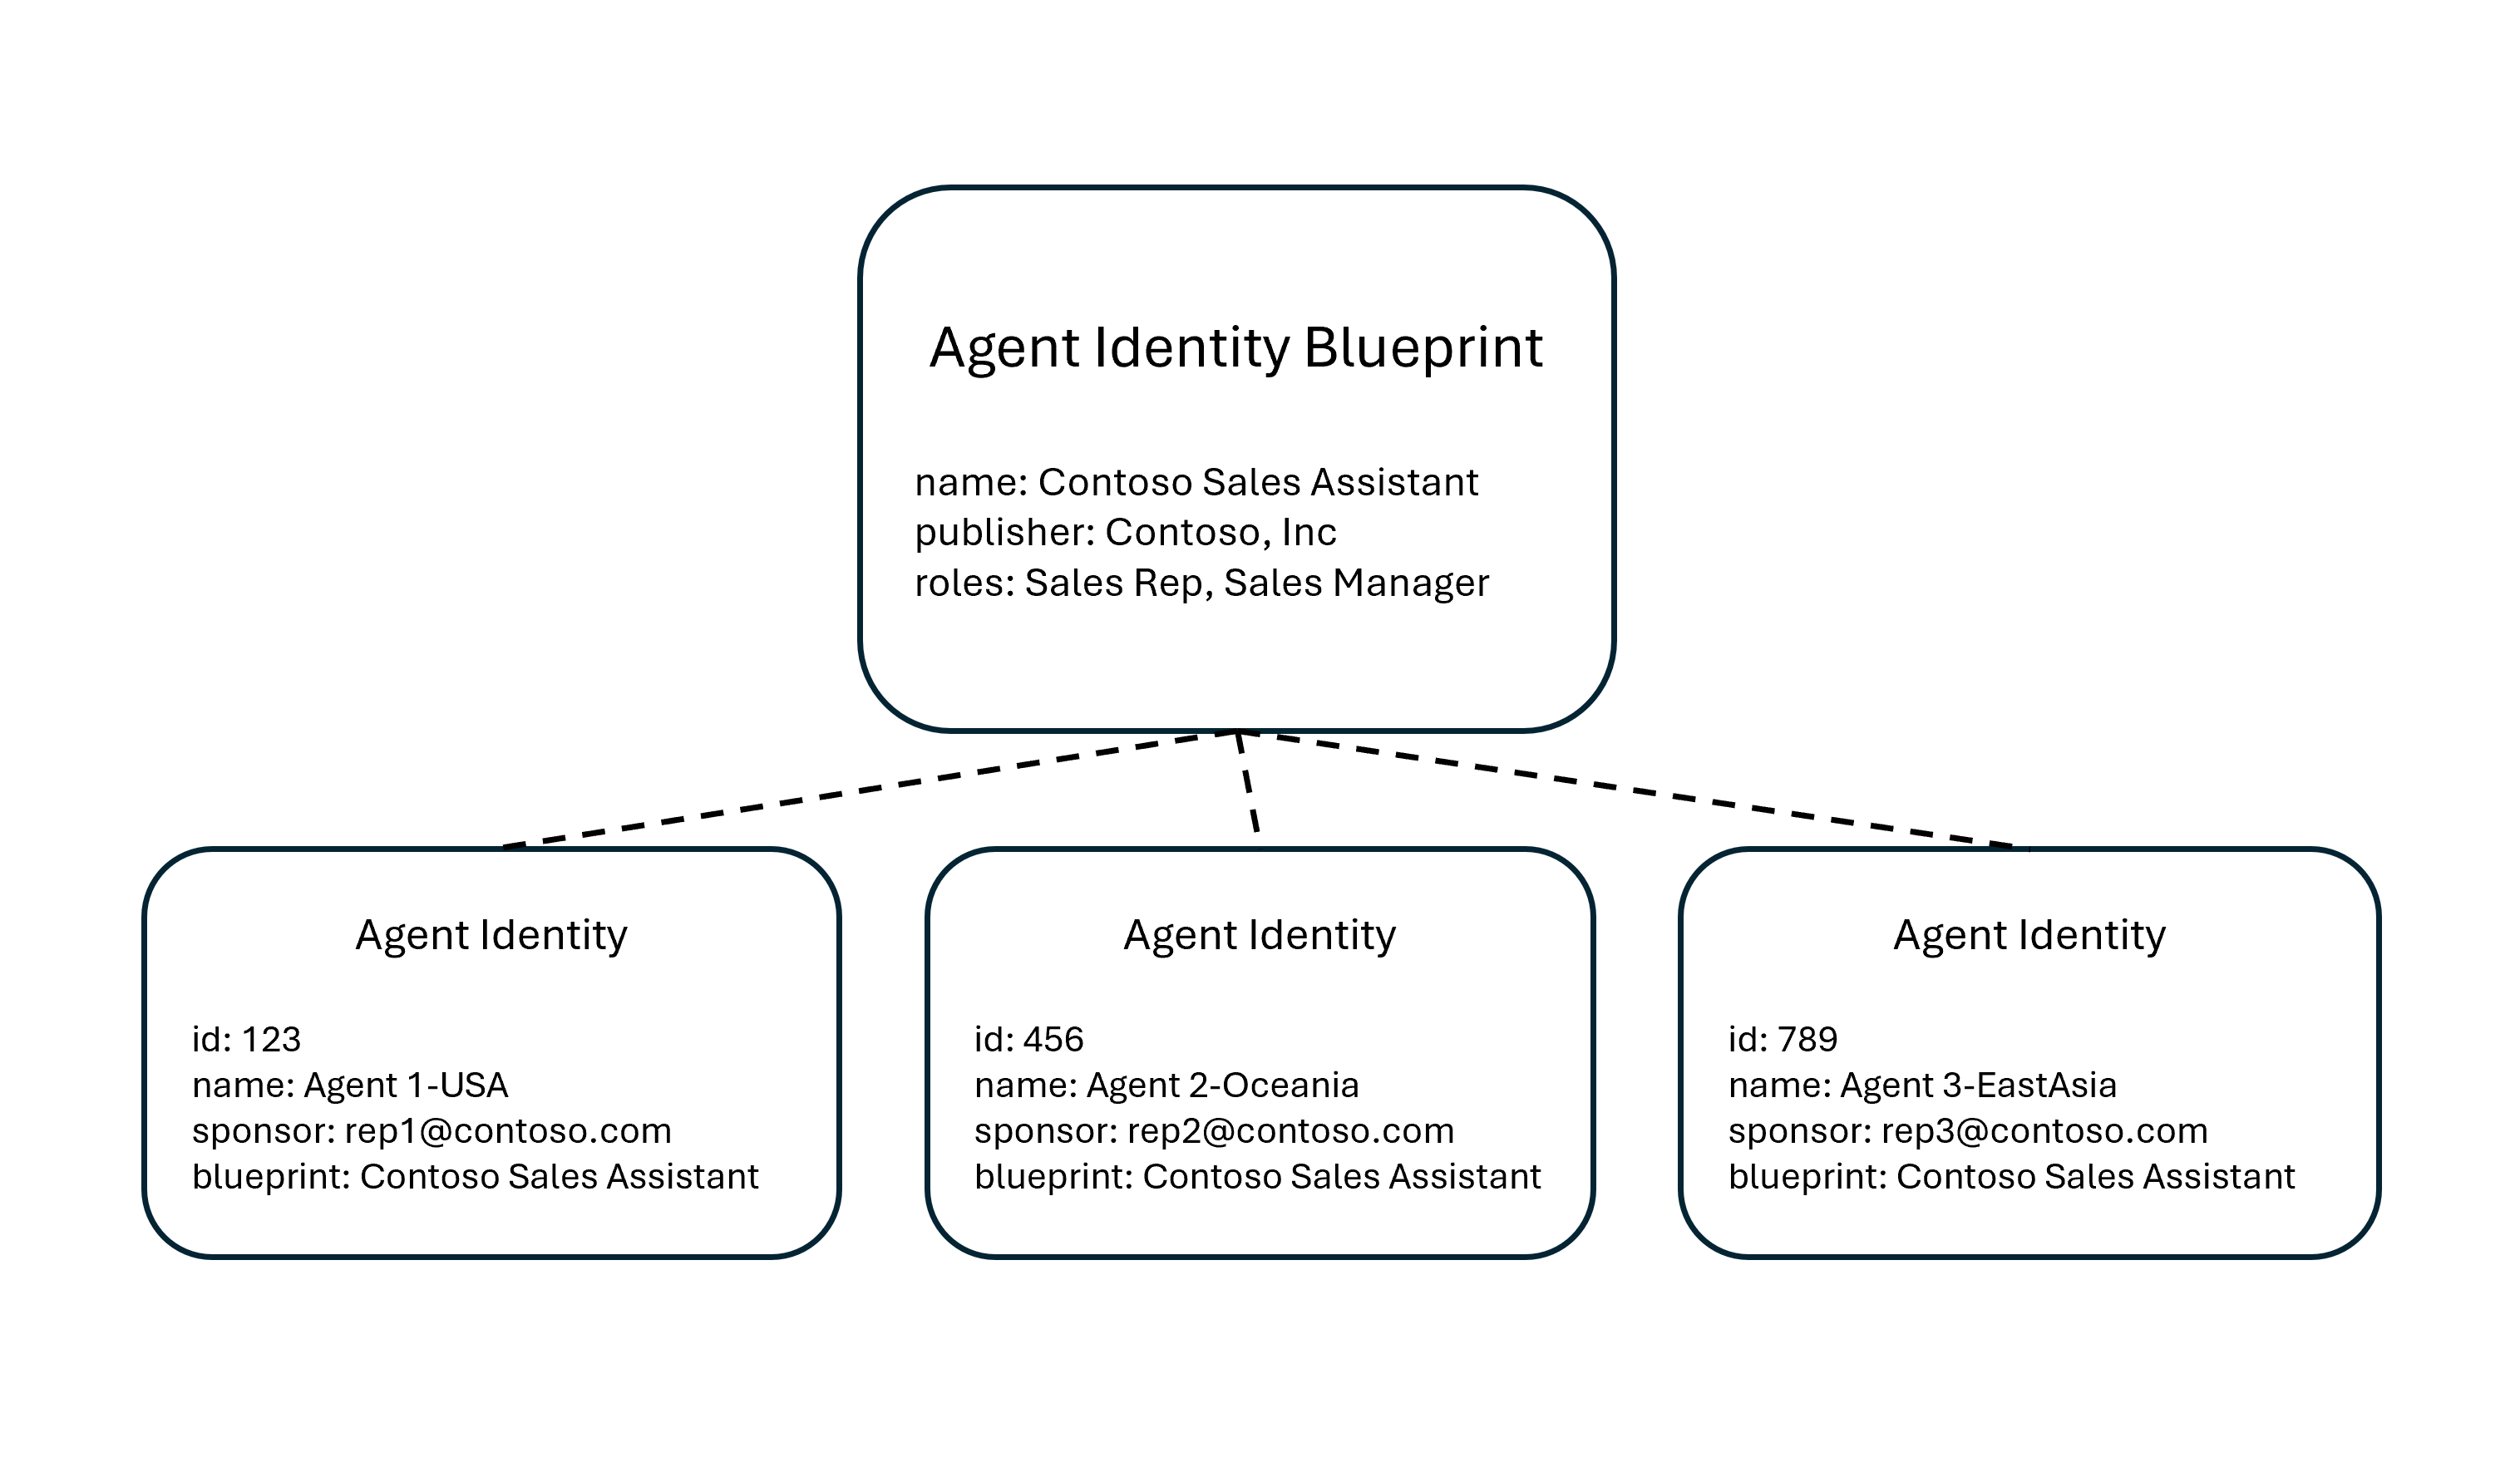
To create an Agent Identity in Microsoft Entra we will have to create an Agent Blueprint first.
An agent blueprint acts as an template for creating agent identities. Its similar to any other examples of blueprint that records the underlying structure and details of the object for which the blueprint is created.
An agent blueprint contains important information regarding authentication, permissions and logs of the underlying agent to which the blueprint is associated with.
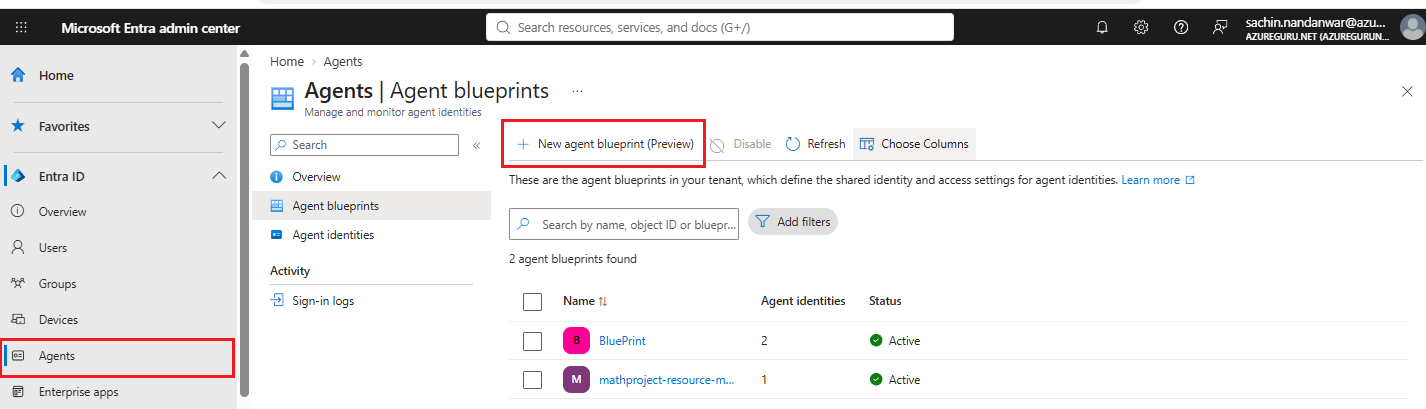
To create a new agent blue print, navigate to the Agents option in Microsoft Entra admin center and click the New agent blueprint option.
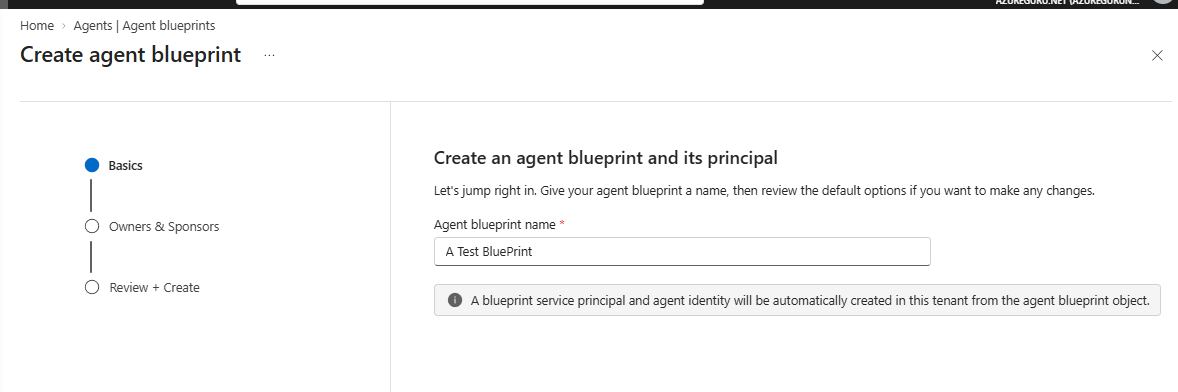
Enter desired blueprint name
Select the Owners and Sponsors
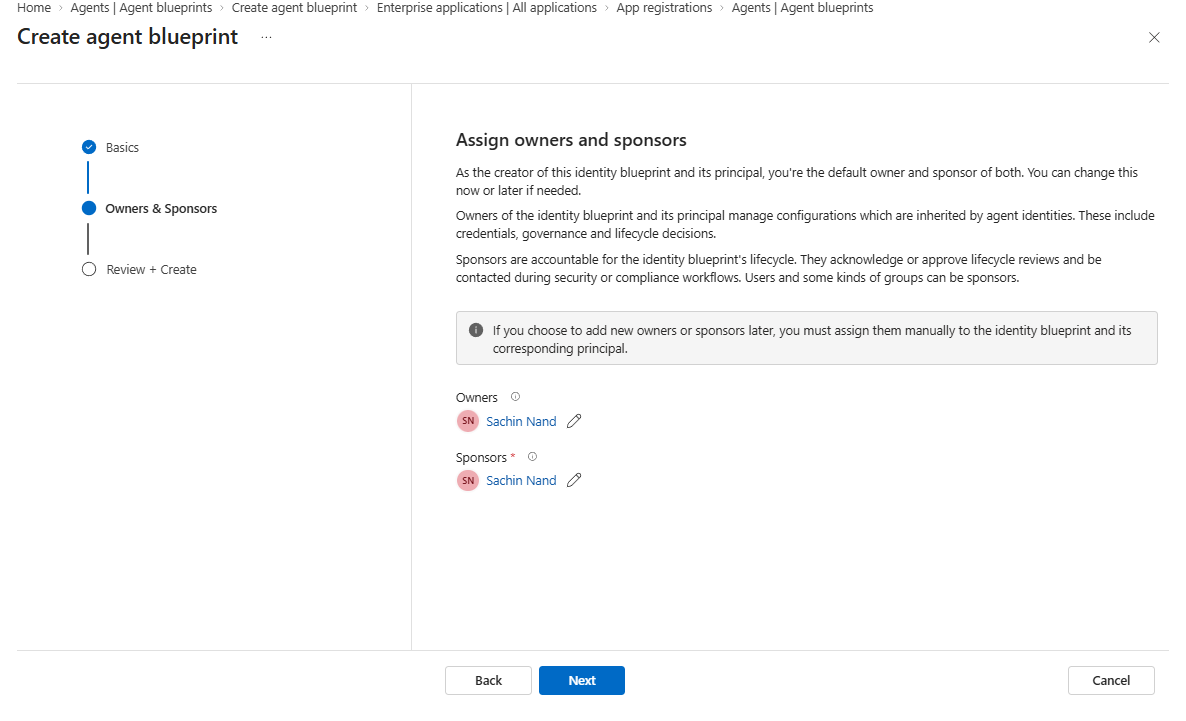
Try to keep the same user as both Owners and the Sponsors.
Click on Create
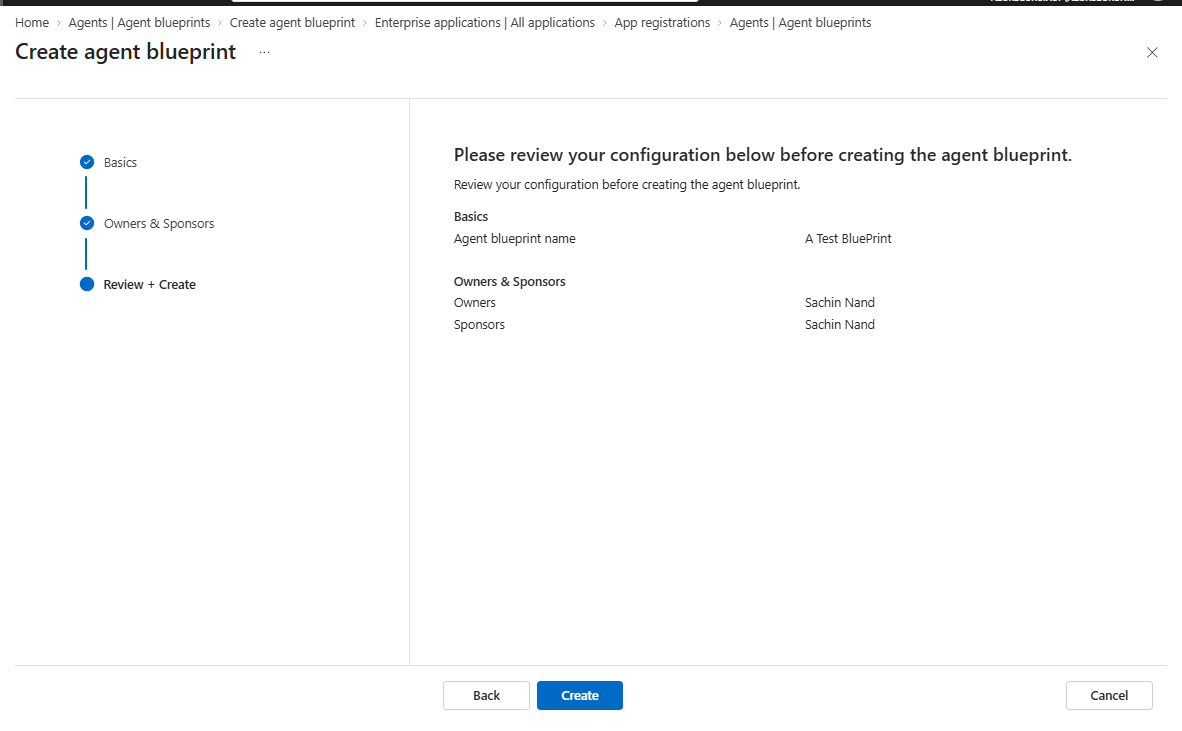
This creates a blueprint with name A Test BluePrint.
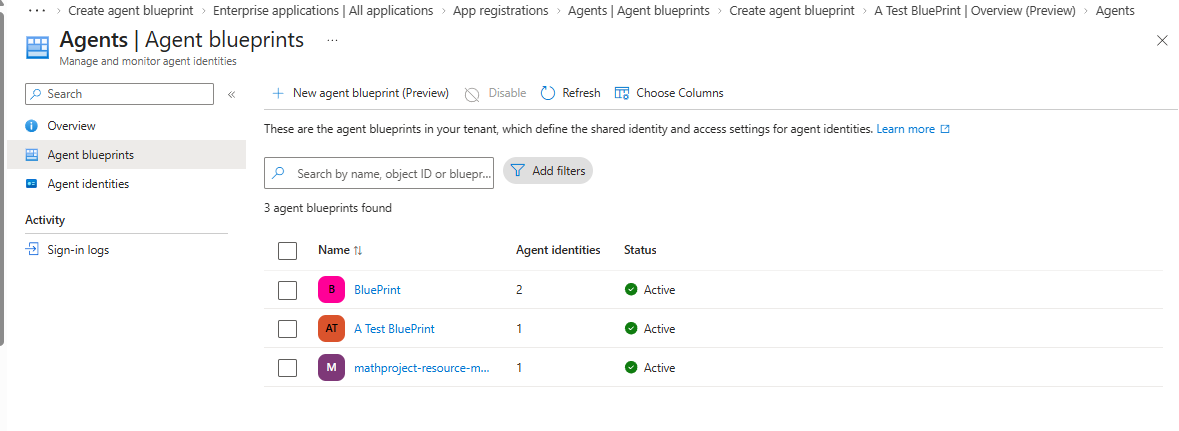
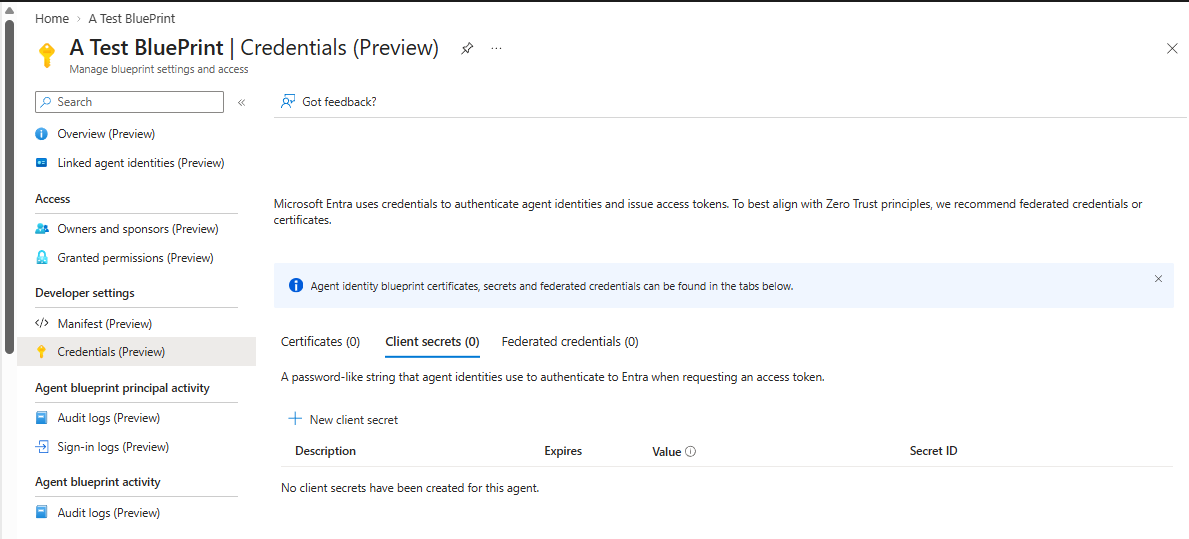
Click on the blue print name and you will navigate to the settings page of the blue print.
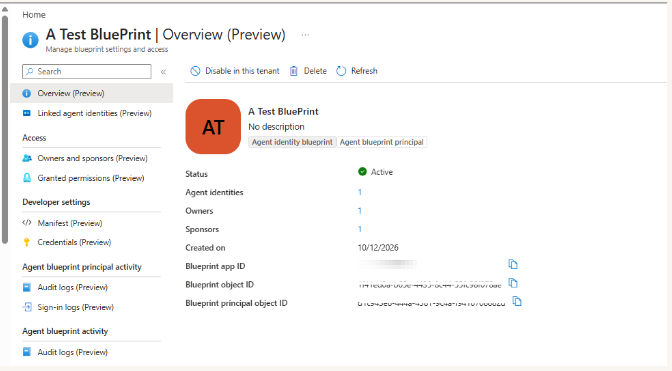
Click on Credentials(Preview) option and you can set up Certificates, Secrets and Federated Credentials for this blue print.
Agent Identity
Now that we have created an Agent blue print, the next step is to create an Agent Identity.
Under the Agents option , select New agent identity (Preview)
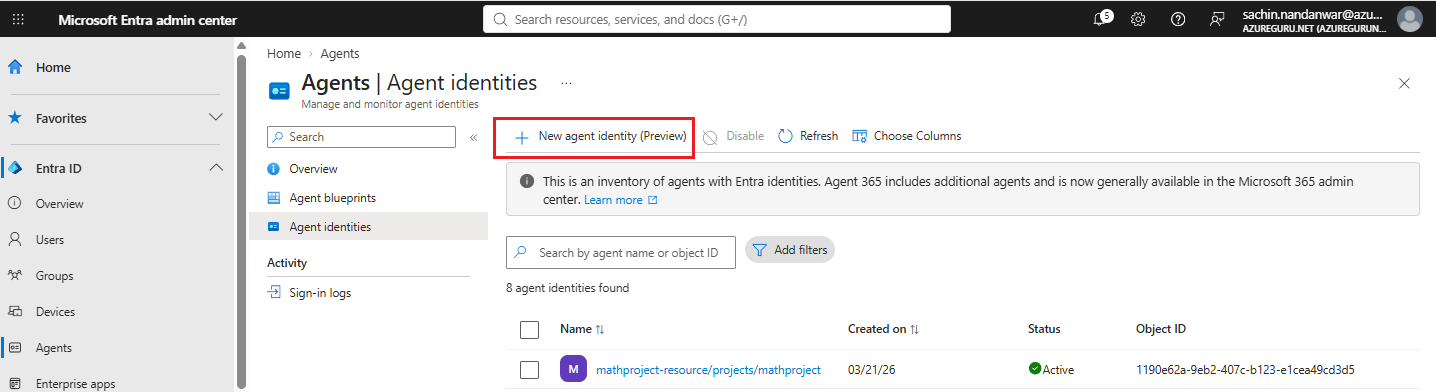
Enter the desired Identity name and select an existing BluePrint to assign to it.
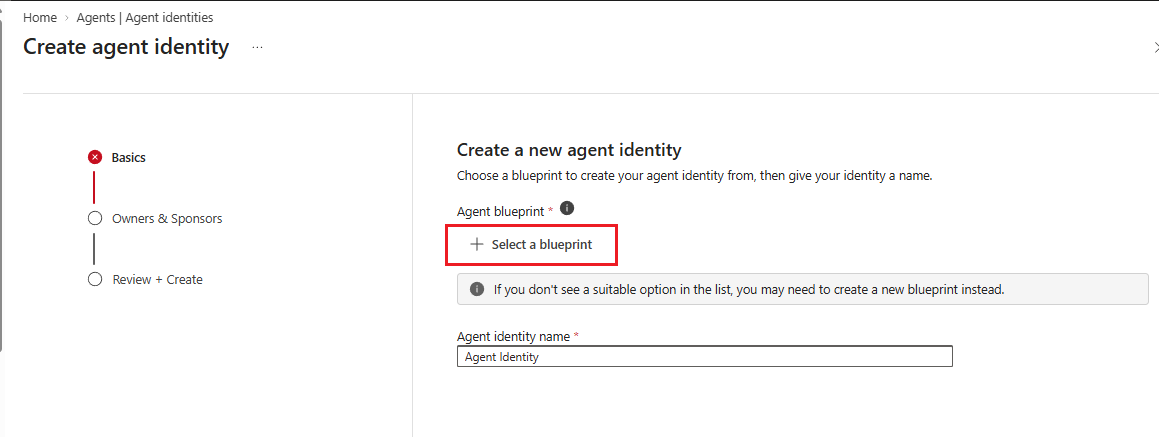
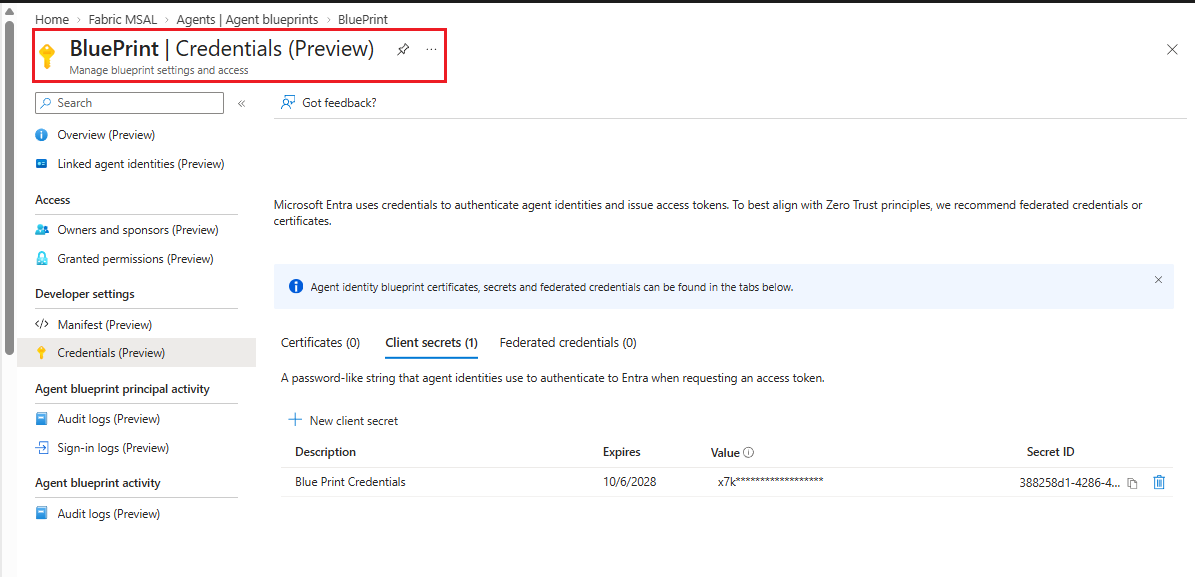
I will use an existing BluePrint called BluePrint that I created earlier whose Client secrets were already configured.
Select the blueprint
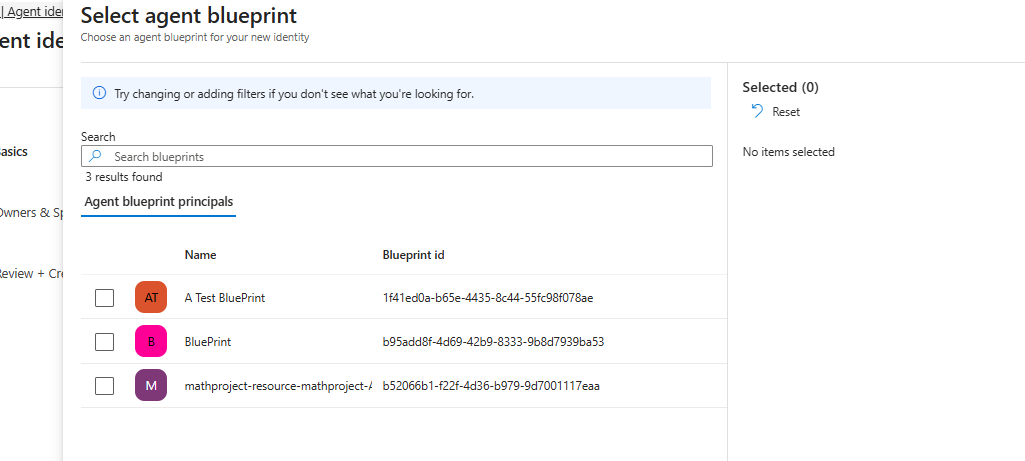
and enter the desired name for the Agent Identity
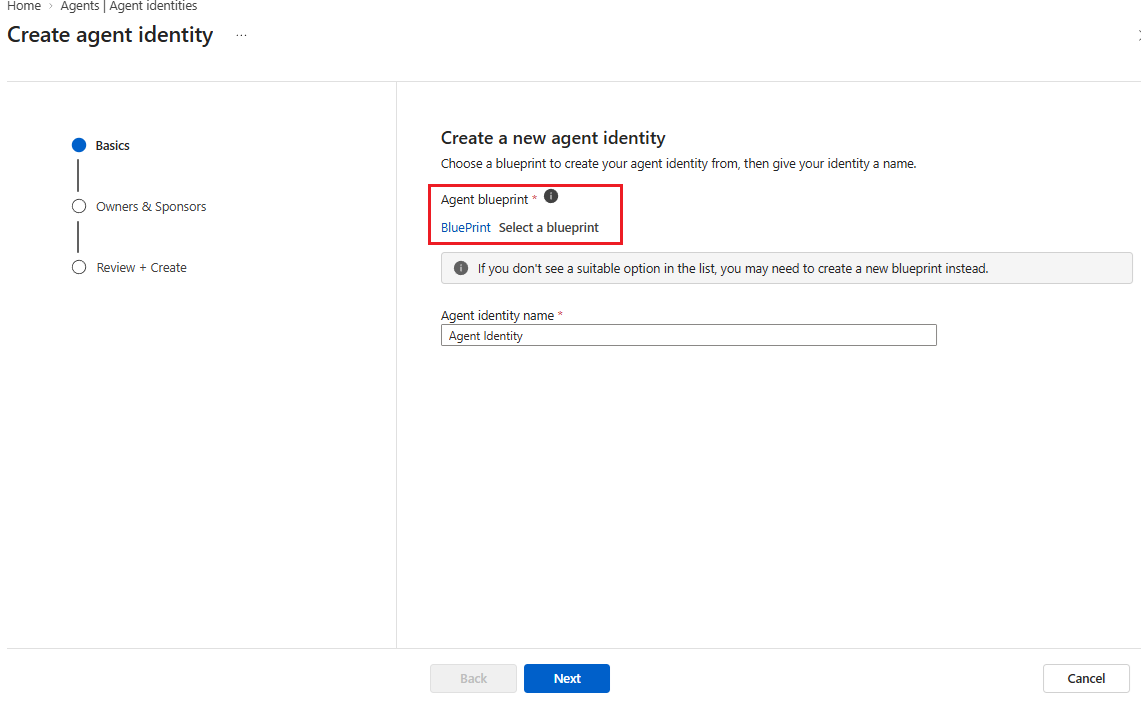
Click Next and keep the default owners of the blue print under the Owners and Sponsors option
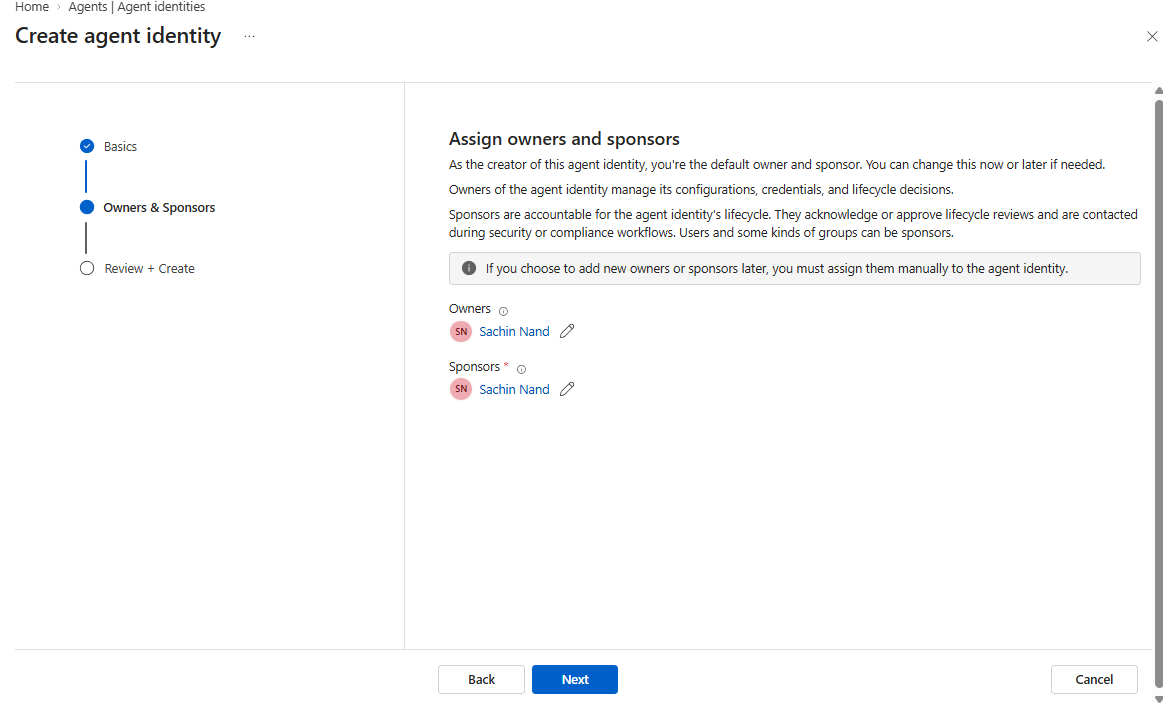
Click Next and select Create
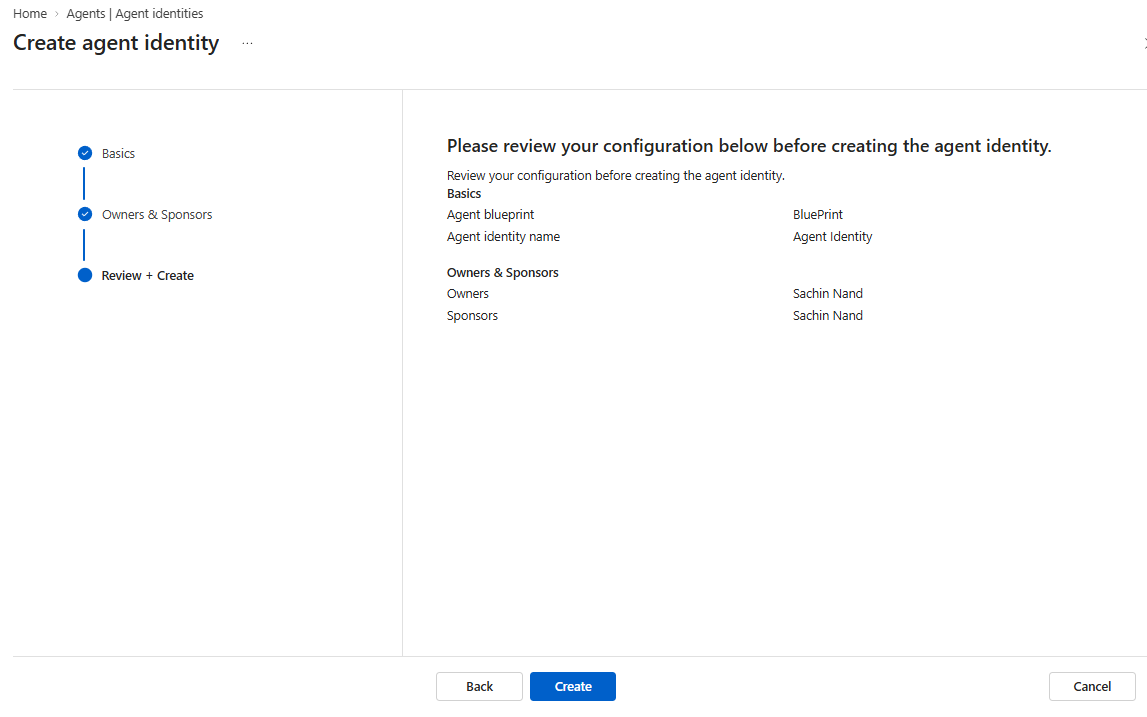
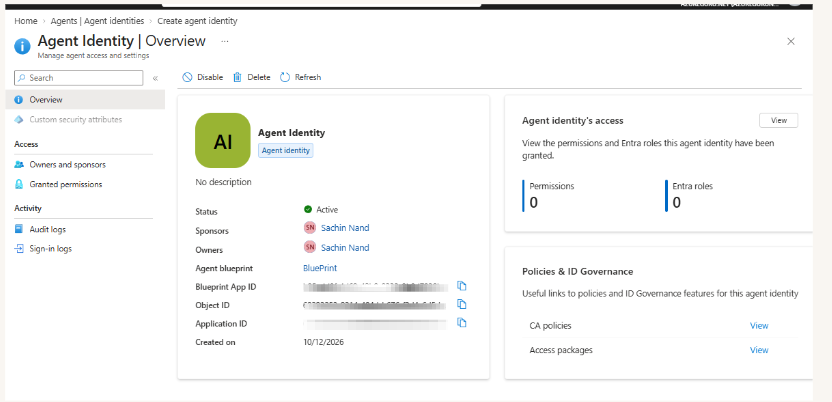
This successfully creates an agent identity called Agent Identity which tied to a blueprint called Blue Print
Agent Identity Azure RBAC
As mentioned earlier in the article, we will use an use case from one of my previous article in which I had set up the Azure storage access for an AI Agent.
In the first step we will first have to grant RBAC to the Agent Identity.
In Azure portal under the IAM option for the target Azure ADLS Gen2 storage
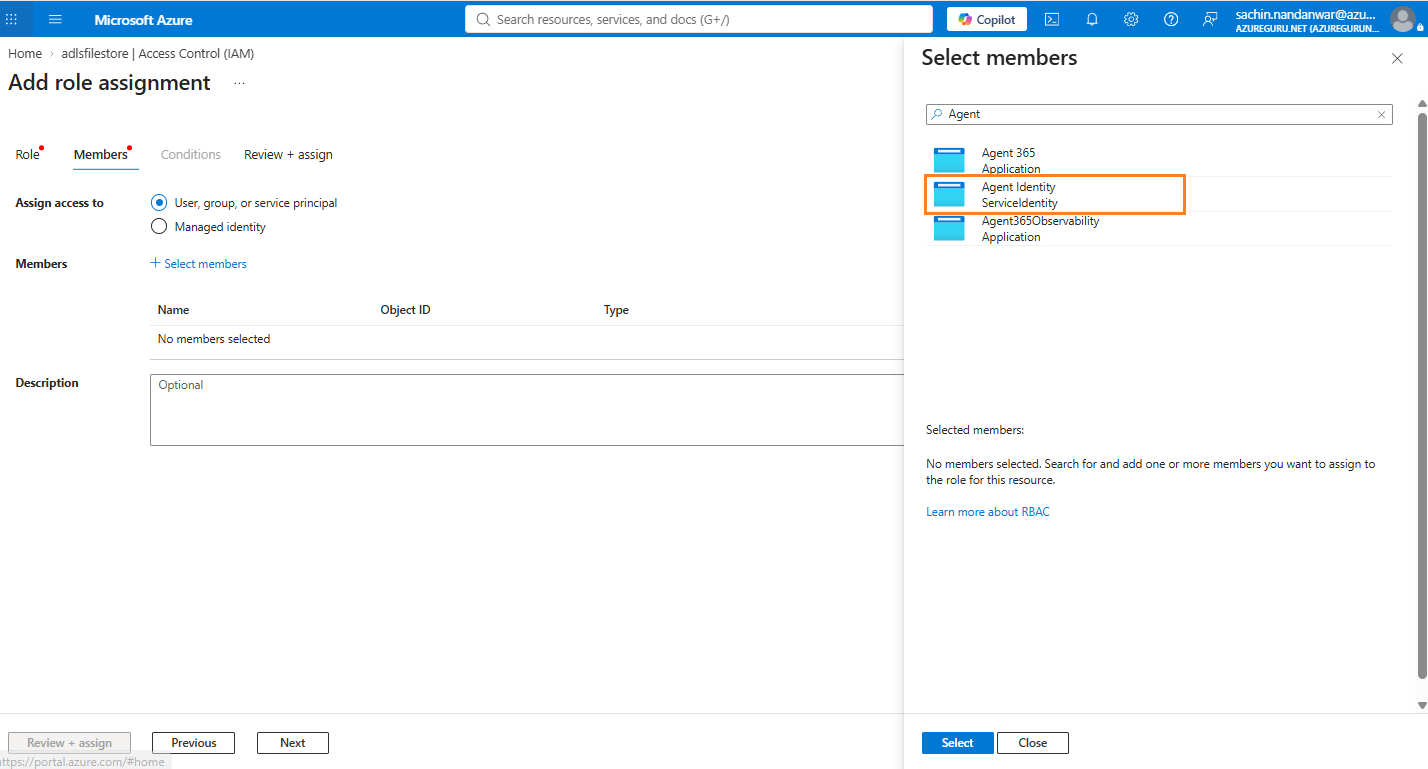
assign Agent Identity the role of Storage Blob Data Owner.

This completes the underlying set up for agent identity.
Code
I was thinking on using Microsoft.Identity.Web through reference for Microsoft.Identity.Web.AgentIdentities.
You can find more details here : https://learn.microsoft.com/en-us/entra/msidweb/call-downstream-apis/agent-identities
The issue with this approach is that it creates access token which is not what we want. We need token credentials for agent identities and not access tokens.
The options left is to use MicrosoftIdentityTokenCredential from namespace Microsoft.Identity.Web or create an access token and then implement a custom token credential implementation that I had blogged about here.
We will go with the first option i.e MicrosoftIdentityTokenCredential
Add the following packages to your project
dotnet add package Azure
dotnet add package Azure.AI.OpenAI
dotnet add package Azure.Core
dotnet add package Azure.Storage.Files.DataLake
dotnet add package Microsoft.Agents.AI
dotnet add package Microsoft.Extensions.AI
dotnet add package Microsoft.Extensions.Configuration
dotnet add package Microsoft.Extensions.DependencyInjection
dotnet add package Microsoft.Identity.Abstractions
dotnet add package Microsoft.Identity.Web
dotnet add package Microsoft.Identity.Web.TokenCacheProviders.InMemory
In the next step, set up appsettings.json to configure the agent identity and Open AI settings
{
    "AzureAd": {
        "Instance": "https://login.microsoftonline.com/",
        "TenantId": "Your Tenant Id",
        "ClientId": "Blue Print App Id",
        "ClientCredentials": [
            {
                "SourceType": "ClientSecret",
                "ClientSecret": "Client Secret of BluePrint"
            }
        ]
    },

    "OpenAI": {
        "Chat_DeploymentName": "Azure Open AI deployment name",
        "EndPoint": "Deployment EndPount",
        "ApiKey": "Open AI API key",
        "AgentIdentityId": "It is the Agent Identity Application Id"
    }
}
Configuration Builder >>
var configuration = new ConfigurationBuilder()
.SetBasePath(AppContext.BaseDirectory)
.AddJsonFile("appsettings.json", optional: false)
.Build();
Declare a variable that returns the container directory list >>
static List<String> listoutput = new();
DI container >>
As we are using Dependency Injection, create a DI container called services.
ServiceCollection services = new ServiceCollection();
Configure services >>
Register the required services in the application
services.AddSingleton<IConfiguration>(configuration);
// Core Identity Web services
services.AddTokenAcquisition();
services.AddInMemoryTokenCaches();
services.AddHttpClient();
//Support for Azure token credential in your service collection:
services.AddMicrosoftIdentityAzureTokenCredential();
// Agent Identities
services.AddAgentIdentities();
// Inject MicrosoftIdentity configuration settings
services.Configure<MicrosoftIdentityApplicationOptions>(configuration.GetSection("AzureAd"));
AzureOpenAIClient >>
var agentcredential = new AzureKeyCredential(configuration["OpenAI:ApiKey"]);

services.AddKeyedChatClient(
"ChatClient",
    (
        sp =>
            new AzureOpenAIClient(new Uri(configuration["OpenAI:EndPoint"]), agentcredential)               .GetChatClient(configuration["OpenAI:Chat_DeploymentName"]).AsIChatClient()
    )
 );
ADLS GEN2 container >>
public static Func <string, MicrosoftIdentityTokenCredential, Task <List<string>>> ReturnContainerDirectories =
          async (ContainerName, credential) => {

            DataLakeServiceClient datalake_Service_Client;
            DataLakeFileSystemClient dataLake_FileSystem_Client;
            string dfsUri = $ "https://adlsfilestore.dfs.core.windows.net";

            datalake_Service_Client = new DataLakeServiceClient(new Uri(dfsUri), credential);
            dataLake_FileSystem_Client = datalake_Service_Client.GetFileSystemClient("customers");
            DataLakeDirectoryClient rootDirectory_ = dataLake_FileSystem_Client.GetDirectoryClient("");
            listoutput.Clear();
            return await TraverseDirectory(rootDirectory_);
          };

public static async Task<List<string>> TraverseDirectory(DataLakeDirectoryClient directoryClient)
{
    await foreach (var item in directoryClient.GetPathsAsync())
    {
        if (item.IsDirectory == true)
        {
            listoutput.Add(item.Name);
            string[] split = item.Name.Split("/");
            var subDir = directoryClient.GetSubDirectoryClient(split.Length == 1 ? split[0] : split[split.Length - 1]);
            await TraverseDirectory(subDir);
        }
    }

    return listoutput;
}
For more details of the above code please refer my article here . The only change here is that I am using MicrosoftIdentityTokenCredential instead of a custom implementation of converting an access token to a TokenCredentials. Details on that aspect is available here .
AIFunction >>
Now we will have to register the above delegate function
services.AddSingleton <AIFunction>
(
    sp =>
{

    return AIFunctionFactory.Create
     (async (string ContainerName) => ReturnContainerDirectories(ContainerName,
        FunctionInvokingChatClient.CurrentContext
        .Options.AdditionalProperties["TokenCredential"] as MicrosoftIdentityTokenCredential ??
        throw new InvalidOperationException(
          "TokenCredential not found in AdditionalProperties.")),
      new AIFunctionFactoryOptions {
        Name = "ReturnContainerDirectories"
      });
  }
);
I have used FunctionInvokingChatClient to pass TokenCredential through additional properties. Please refer to my article here on FunctionInvokingChatClient for more details.
Build DI Container >>
ServiceProvider serviceProvider = services.BuildServiceProvider();
At this stage we have built all the pre requisites for the AI Agent.
In the next steps through MicrosoftIdentityTokenCredential we will set up the TokenCredentials.
TokenCredentials >>
var tokenAcquirerFactory = serviceProvider.GetRequiredService<ITokenAcquirerFactory>();
var authSchemeProvider = serviceProvider.GetRequiredService<Microsoft.Identity.Abstractions.IAuthenticationSchemeInformationProvider>();
We have used two interfaces
ITokenAcquirerFactory : It provides access to the Microsoft Identity Web token infrastructure and generates the access token to produce
ITokenAcquirerinstances.IAuthenticationSchemeInformationProvider : It provides information about the authentication scheme.
The instances of these two interfaces are resolved from Dependency Injection.
Reccall : Earlier we registered
AzureAdconfiguration as options forMicrosoftIdentityApplicationOptions.services.Configure(configuration.GetSection("AzureAd"));
Remember the following details to remove any confusion
Configure < MicrosoftIdentityApplicationOptions > binds configuration values such as
TenantId,ClientId, andInstance.ITokenAcquirerFactory is a service that provides token-acquisition infrastructure.
IAuthenticationSchemeInformationProvider provides details of the authentication scheme
MicrosoftIdentityTokenCredential uses that infrastructure to acquire access tokens.
TokenCredentials = new MicrosoftIdentityTokenCredential(
    tokenAcquirerFactory,
    authSchemeProvider);
 TokenCredentials.Options.WithAgentIdentity(configuration["OpenAI:AgentIdentityId"]);
TokenCredentials.Options.RequestAppToken = true;
The above code creates TokenCredentials for AgentIdentityId configured in appsettings.json.
ChatClient >>
Create an instance of chat client
var chatclient = new ChatClientAgent(serviceProvider.GetKeyedService<IChatClient>("ChatClient")).ChatClient;
List AI Functions >>
Get a list of the registered AI Functions
var aifunctions = serviceProvider.GetServices<AIFunction>();
List<AITool> functions = new(aifunctions);
ChatClientAgentOptions >>
Set up AdditionalProperties to be passed to the FunctionInvokingChatClient.
  var optionsagent = new ChatClientAgentOptions() {
   ChatOptions = new ChatOptions() {
       Instructions = "You return list of Azure directories for the given container",
         Tools = functions,
         AdditionalProperties = new AdditionalPropertiesDictionary {
           ["TokenCredential"] = TokenCredentials
         }
     },

     Name = "Azure ADLS"
 };
AgentReponse >>
Get the agent response
 var agent = chatclient.AsAIAgent(optionsagent);
 AgentResponse response = await agent.RunAsync("Give me list of all folders in container customers");
 Console.WriteLine(response.Text);
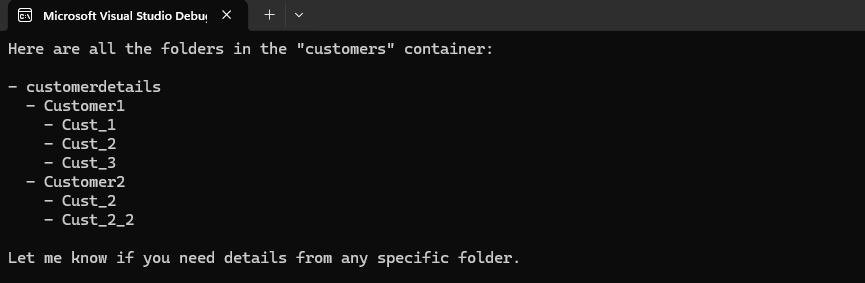
The agent response returns the details of all the objects under the container customers
Execution
Conclusion
Agent Identities provide a secure and scalable way for AI agents to authenticate and access resources without relying on individual user credentials. This enables agents to operate with their own identities akin to Azure Managed Identity making it easier to manage permissions and enforce the principle of least privilege.
As AI agents become increasingly autonomous, Agent Identities will play a crucial role in enabling secure interactions and accesses. Hence its very prudent to understand the underlying artifacts and settings required for agents to be able to access the resources that it requires without any human intervation.
Thanks for reading !!!